Questions
- I haven’t received my purchase receipt. When will I receive it?
- How to install a theme?
- How to add license key?
- How to translate a theme to your local language ?
- What should i do if my site looks broken after the theme update?
1. I haven’t received my purchase receipt. When will I receive it?
It can take up to 30 minutes for your purchase receipt to arrive. If the email is still missing, and it is not in your spam folder or Promotions tab, it might indicate that you have had a typo in your email address when purchasing. Or it might be possible that there is some delay in email delivery from the email server. Write to us at support@falgunithemes.com and we will resolve it as soon as possible. Please include an alternative email address in your message, in case your server is blocking us.
2. How to install a theme ?
Download the theme package (yourtheme.zip) file from the link sent in your purchase receipt. Once you have downloaded the theme’s zip file, go to your WordPress website admin page and perform the following steps:
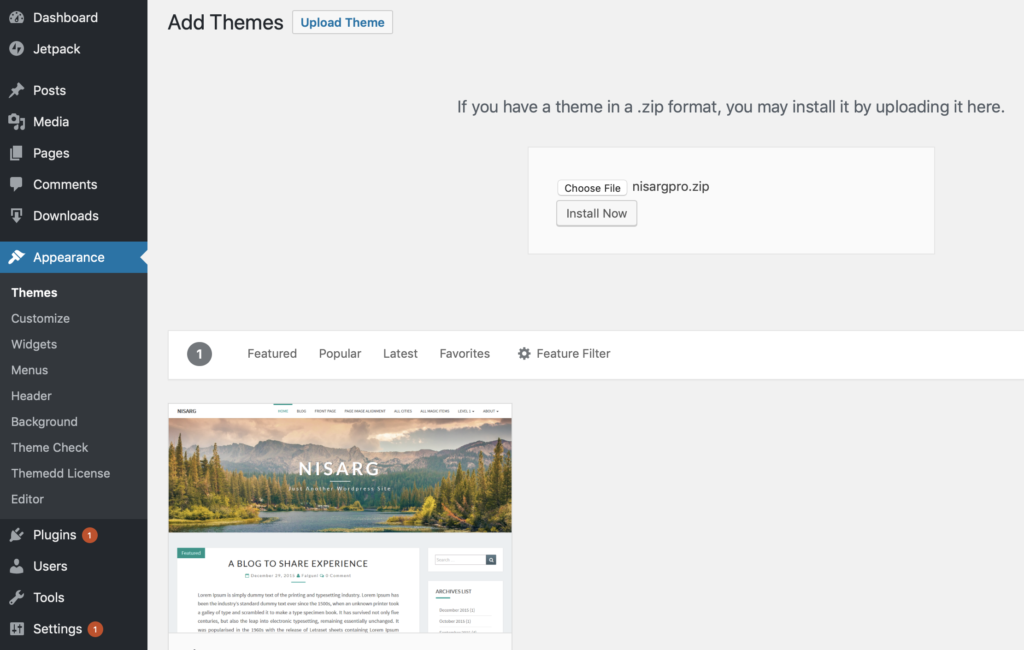
1. Log in to the WordPress Dashboard.
2. Select the Appearance panel, then Themes.
3. Select Add New.
4. Use the Upload Theme link in the top links row to upload a zipped copy of the theme, that you have previously downloaded to your machine.
5. Once the zip file gets uploaded to your website, click on Activate link to activate the theme.
For an in-depth documentation about WordPress theme manual installation, read the official WordPress.org documentation.
3. How to add license key?

License Key Settings:
To setup license key, your theme must be the active theme on your WordPress site. So first activate the theme for which you want to add license key.
You will receive a license key along with your purchase confirmation. As long as license key is active, you to get automatic updates for the purchased WordPress theme.
To license your theme :
1. Go to Appearance > Theme license.
2. Paste your license key in the textbox.
3. Save and activate license key and you’re done.
4. How to translate a theme to your local language ?
The Nisarg PRO theme is translation ready. You can translate all the strings used in the theme to your local language, To translate the theme to your local language, you need to use POEDIT software.
The steps to translate the NisargPRO theme to your local language using POEDIT are as follows:
- Unzip the nisargpro.zip file you downloaded from the purchase receipt. The file unzip will create a nisargpro folder.
- Download and Install POEDIT on your local machine.
- Open Poedit and select Create new translation.

- A new window will pop up, select the nisargpro.pot file from nisargpro folder. A Theme’s default translation template is located in nisargpro/languages/nisargpro.pot.

- Next, from a dropdown menu ( for selecting language of translation), select a language you want to translate your theme to. You are ready to translate your theme now.

- Now you can start translating your theme. The space at the top will display all the text ready to translate, and any completed translations will display to the right. The boxes underneath show the source text you’ve selected to translate, your translation and any notes for translators. It’s easy to cycle through the text and enter your translations.

- Translating a line of text is really easy – just select a word or phrase, enter your translation and click “Update.”
- When you’ve finished translating, simply save your file. Poedit will automatically create both .po and .mo files in your theme’s languages folder.

- After Translating the theme in languages files you can either choose any one of the two below options.
-
Option 1:
- Create a child theme of your translated theme. You can download the child theme for your theme here:
Download NisargPRO Child Theme
Download Sanchay Child Theme - Unzip the child theme and you will get a child theme folder(e.g. nisargpro-child).
- Put your translated translation files ( the .po and .mo files )in languages folder(e.g. nisargpro-child/languages) of your downloaded child theme.
- After coping the translation files ( the .po and .mo files ) in the languages folder, zip the child theme folder(e.g. nisargpro-child.zip)
- Upload and install the child theme’s zip file to the WordPress Dashboard > Appearance > Themes > Add New. Just like you uploaded your parent theme.
- Once the the child theme is installed, activate the child theme (e.g. NisargPRO-Child).
- Create a child theme of your translated theme. You can download the child theme for your theme here:
-
Option 2:
- After saving the translation ( the .po and .mo files )in languages folder, zip the nisargpro folder. When you zip nisargpro folder, you will get nisargpro.zip file.
- Now that your theme has been translated, you can upload it to your WordPress install either using FTP or by logging into your WordPress site and uploading your theme by going to Appearance > Themes > Install Themes (after you’ve zipped your theme (with new translation files), of course).
-
- The advantage of using the child theme option (i.e. option 1) is that when you will update the Parent theme to the newer version you will not loose the translations you made.
5. What should i do if my site looks broken after the theme update?
After updating the theme to the next version, if you see the broken website or feel that the changes are not reflected on the website, then please clear all cache memories. Your web browser, hosting server, and caching plugins can all serve cached content which can make it difficult for you to see the changes you made to your website right away. Clearing your WordPress cache is also the first troubleshooting step that needs to be performed. Please refer to the article on how to clear all the cache memories.